01What FoliageTool does.
FoliageTool is a 3ds Max plugin for fast placement of vegetation, rocks, debris, decorative props and other repeating elements over scene surfaces.
The plugin lets you "paint" objects directly in the viewport: pick a surface, pick one or several source objects, then place instances with the brush, with single clicks, or remove them with the eraser.
Typical use cases
- placement of grass, shrubs, flowers and trees;
- distribution of rocks, branches, leaves and debris;
- fast landscape coverage;
- varied environments without manual copying of objects;
- working with several source objects at once.
02Installing the plugin.
2.1. Requirements
- Autodesk 3ds Max of a matching version;
- the plugin binary file with the
.dloextension; - an active RS-Systems license (when required);
- for scenes with V-Ray Proxy — V-Ray of the matching version.
2.2. Installing the prebuilt version
- Close 3ds Max.
- Copy
FoliageTool.dlointo the 3ds Max plugins folder.
Typical paths:
C:\Program Files\Autodesk\3ds Max <version>\Plugins\
or a user plugins folder configured in 3ds Max preferences.
- Launch 3ds Max.
- Open the object creation panel: Create → Geometry.
- In the category dropdown choose Foliage Tool.
- In the object list pick Foliage Tool.
If the plugin is installed correctly, the object will appear in the Geometry category.
2.3. License
On first launch the RS-Systems License window may appear. Available actions:
- Buy license — opens the license purchase page;
- Check license — re-validates the license online;
- Import license… — imports an
.rsliclicense file; - Open account cabinet — opens the personal cabinet on the site;
- rs-systems.org — opens the RS-Systems website;
- Close — closes the window.
If the license is active, the plugin will load and become available in 3ds Max. If the license is missing or validation fails, the plugin may not load.
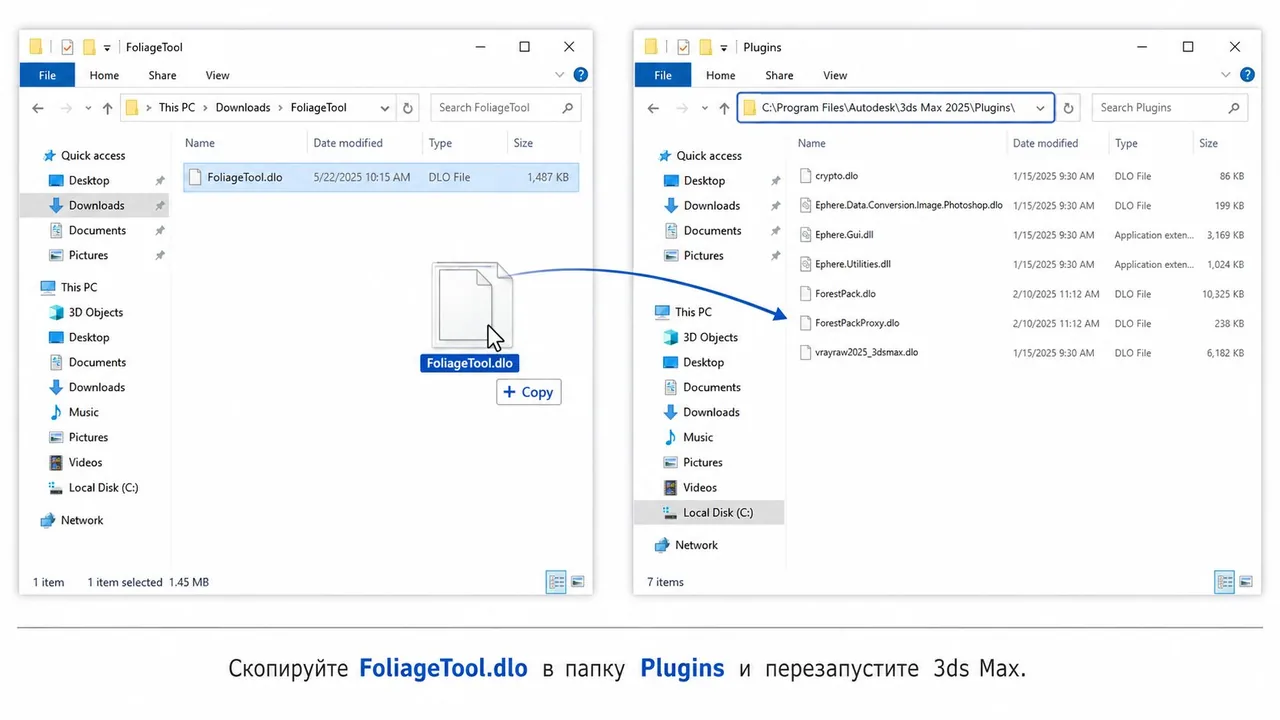
Copy FoliageTool.dlo into the Plugins folder of your 3ds Max version and restart the program.
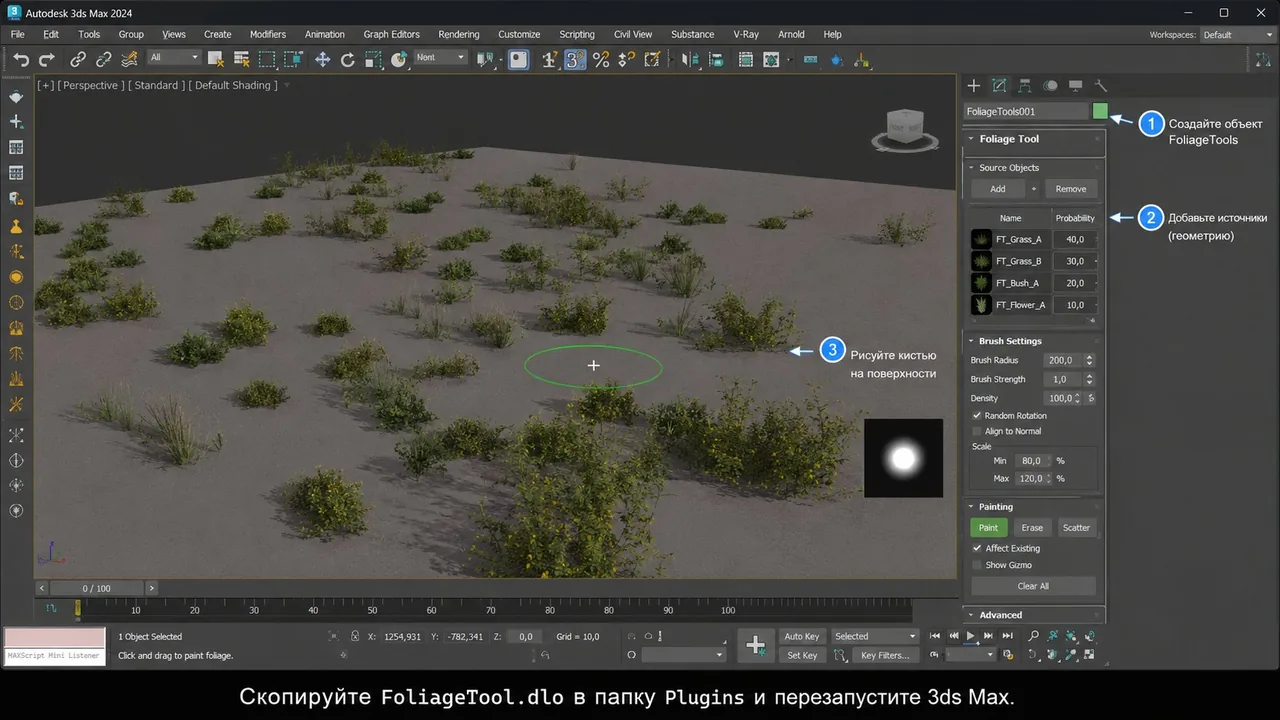
03Launching FoliageTool in the scene.
- Open the scene in 3ds Max.
- Go to Create → Geometry → Foliage Tool.
- Create a Foliage Tool object in the scene by clicking in the viewport.
- Select the created object.
- In the Modify Panel the FoliageTool interface appears, with the main parameter groups:
- Display
- Surfaces
- Source Objects
- Paint
- Brush
- Scale (%)
- Rotation (deg)
- Align to Normal
After installation FoliageTool appears in Create → Geometry → Foliage Tool.
Create the Foliage Tool object in the scene and switch to the Modify tab to configure it.
04Surfaces and source objects.
The plugin needs two types of objects.
Surface
Surface is the geometry over which instances will be placed — ground, slope, terrain, plane, landscape mesh.
Source Object
Source Object is the object that will be placed onto the surface — grass, bush, tree, rock, flower, branch. You can add several source objects: FoliageTool then picks one randomly at each placement for a more natural distribution.
05Adding a surface.
- Select the Foliage Tool object.
- In the Surfaces group press Pick.
- Click the object in the scene that should be used as the surface.
- The object appears in the Surfaces list.
Several surfaces can be added. For example, several ground patches or several separate mesh objects.
To remove a surface: select it in the Surfaces list and press Remove.
In the Surfaces group press Pick and choose the surface that objects will be placed on.
06Adding source objects.
- Select the Foliage Tool object.
- In the Source Objects group press Pick.
- Click the object that should be placed across the surface.
- The object appears in the Source Objects list.
Regular mesh/poly objects are supported, as well as V-Ray Proxy when available in the scene.
To add multiple plant variants, repeat the action for each object.
Removing a source object
- Select the object in the Source Objects list.
- Press Remove.
Replacing a source object
- Select the object in the Source Objects list.
- Press Replace.
- Click the new object in the scene.
Add one or more Source Objects — they will be distributed over the chosen surface.
07Brush Paint, Erase and Single.
FoliageTool offers three placement modes accessible from the Paint group.
Brush Paint
Paint instances with a brush. Hold the left mouse button in the viewport and drag the cursor across the surface; FoliageTool places objects within the brush radius.
Erase
Erase placed instances within the brush radius. Use it to form paths, clean zones and natural openings.
Single
Place a single instance per click. Useful for precise placement of individual objects.
Brush Paint hotkeys
Brush Paint places objects with a brush directly in the viewport.
Erase removes placed instances within the brush radius — useful for fast cleaning of selected zones.
08Display modes.
The Display group controls how placed objects appear in the viewport. Lighter display options keep the viewport fast while painting; switch to a more detailed display for a final check.
- Dot — minimal display, fastest viewport response.
- Wire — wireframe display for placement preview.
- Full — full geometry display for the final preview.
09Brush parameters.
The Brush group controls how the brush behaves.
| Parameter | Typical value | Description |
|---|---|---|
| Radius | 100 | Brush radius. Defines the area in which instances are placed in one stroke. |
| Spacing | 40 | Minimum distance between placed instances. Smaller value = denser placement. |
| Pressure | 1.0 | Placement intensity. Low value gives a sparse, careful distribution; high value gives dense planting. |
Radius sets the brush size, Spacing controls the distance between instances, Pressure controls the placement intensity.
10Random scaling.
The Scale (%) group controls the random scale applied to placed objects.
| Parameter | Example | Description |
|---|---|---|
| Min | 80% | Minimum scale in percent. |
| Max | 120% | Maximum scale in percent. |
With Min 80 / Max 120, each placed object receives a random scale between 80% and 120%. The spread helps avoid repetition and gives more natural-looking vegetation.
11Random rotation.
The Rotation (deg) group controls the random rotation applied to each instance.
| Parameter | Typical value | Description |
|---|---|---|
| X | 0 | Random rotation around the X axis. |
| Y | 0 | Random rotation around the Y axis. |
| Z | 360 | Random rotation around the Z axis. 360 = full random rotation around the vertical. |
| Step | 1 | Snap step for the rotation in degrees. |
A typical vegetation preset (X 0, Y 0, Z 360, Step 1) lets objects rotate freely around the vertical axis while staying upright. For more chaotic tilt, increase X and Y.
Random scale and rotation help avoid repetition and make the result more natural.
12Orientation to the surface.
The Align to Normal option controls how objects orient themselves relative to the surface.
- Off — objects remain vertical relative to the world Z axis. Suitable for trees, shrubs and grass that should grow upright even on a slope.
- On — objects align with the surface normal. Suitable for rocks, moss, leaves and objects placed on walls, slopes or uneven surfaces.
Align to Normal aligns objects to the surface normal. For trees the off mode is usually preferred; for rocks — the on mode.
13Example: scattering grass on a landscape.
- Prepare a terrain or plane that will be used as ground.
- Prepare several grass or shrub objects.
- Create a Foliage Tool object.
- In the Surfaces group press Pick and choose the ground.
- In the Source Objects group press Pick and choose several grass objects.
- Set the parameters:
Radius:        100
Spacing:       40
Pressure:      1.0
Scale Min:     80
Scale Max:     120
Rotation Z:    360
Align Normal:  Off
- Press Brush Paint.
- Paint grass across the surface.
- Switch to Erase to remove unnecessary patches.
- Use Single for precise placement of individual objects.
FoliageTool speeds up the creation of natural environments and gives flexible control over density, scale and orientation of objects.
14Working tips.
- For a natural result, use several source objects with different shapes and heights.
- Don't set Spacing too low on heavy objects — that may slow the scene down.
- For grass and bushes, keep Align to Normal off so they grow vertically.
- For rocks, leaves and objects lying on the surface, turn Align to Normal on.
- Start in Dot or Wire display mode and switch to full display only for the final check.
- Use Erase to form paths, clean zones and natural openings.
15Possible problems.
The plugin does not appear in 3ds Max
Check that:
- the
.dlofile was copied into the correct Plugins folder; - the plugin version matches the 3ds Max version;
- 3ds Max was restarted after the installation;
- the license is active;
- there are no plugin load errors when 3ds Max starts.
Brush Paint does not start
Make sure that:
- at least one surface is added to Surfaces;
- at least one object is added to Source Objects.
Without surface and source objects the Brush Paint and Single modes will not start.
Objects do not appear on the surface
Check that:
- the correct surface is selected;
- the cursor is over a surface object;
- the source object has not been removed from the scene;
- Spacing is not set too high;
- Pressure is not set too low.
Objects are tilted incorrectly
Check the Align to Normal option. Turn it off if objects should stand vertically, turn it on if they should follow the surface tilt.