
RS.Schedules
Version history
RS.Schedules extends Revit schedules: it shows hidden columns, replaces the schedule properties dialog with its own (fields, filter, sorting, formatting, and appearance), and fills element parameters using rules, much like a combined parameter but with the result written to a regular parameter.
1.3.6–1.3.34 | 15–22.10.2026
The Play button on the schedule ribbon recalculates the fill rules set to “Manual” in the open schedule, for its visible elements only, in a single transaction (one Ctrl+Z to undo). The result appears in the status bar. “Automatic” rules recalculate on their own. Advanced “Filter” expressions still write to all elements in the category; otherwise, a hidden element could not return to the table.
Hide/Unhide: when cells in one or more columns are selected, the button toggles those columns’ hidden state (with “Show Hidden” enabled, a hidden column becomes permanently visible). When nothing is selected, a dialog lists the columns with a “Hidden” checkbox; Revit does not allow all columns to be hidden. The “Autofill” button has been renamed “Schedule Expert”.
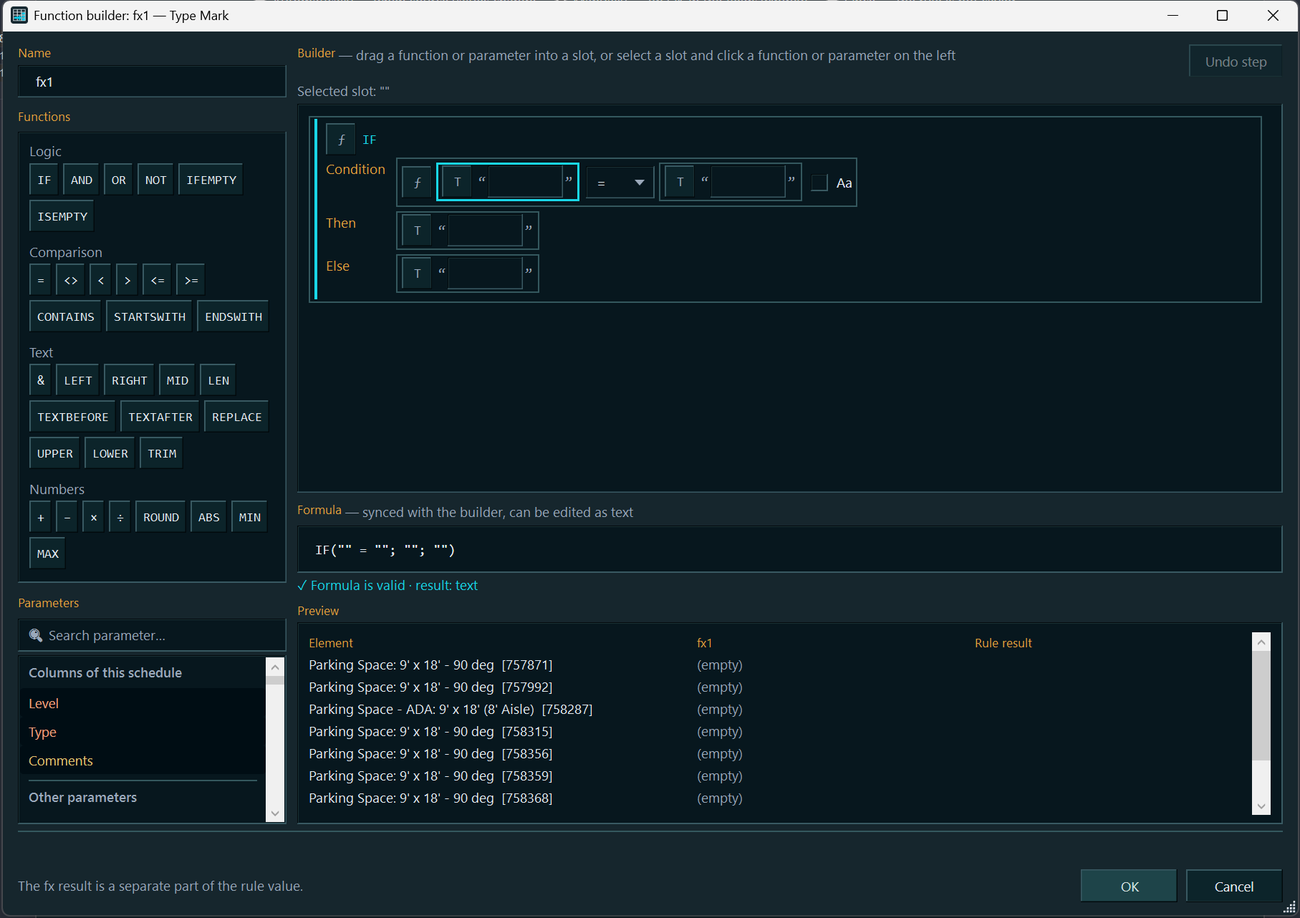
The ƒx function builder opens directly from the ƒx button: conditions (IF, AND, OR), comparisons, text and numeric functions, parameter search, drag-and-drop into slots, and an editable text formula. It previews the first 10 elements and checks for errors, indicating their position. Added IFEMPTY, TEXTBEFORE, TEXTAFTER, ABS, MIN, and MAX. Existing rules are retained.
Shared rules library: the “Rules…” button (double pencil) displays all rules in the model and applies the selected rule to the selected parameter. This creates a linked rule: all copies share one definition. Clicking OK applies edits to every schedule in one undoable operation; values are recalculated according to each schedule’s mode. When a Revit schedule is copied, its rules are copied with it, shared links are retained, and the copy’s rules do not interfere with the original’s.
New rule source “Sequence number”: continuous numbering in schedule row order, with a starting value, increment, and number of digits (for example, “U-001”), without restarting within groups. Total rows and elements from linked files are not numbered. Recalculation is available only in “Manual” or “Once” mode; selecting “Automatic” switches the mode to “Manual”. This feature has not yet been tested in Revit. Check it on your own schedule with sorting and a hidden column.
Fill rules: substrings and letter case are now set with a part formula (LEFT, RIGHT, MID, UPPER) or the ƒx function. The “Substring”, “N”, and “M” columns have been removed. Existing rules are migrated automatically when opened, and the status bar reports the number of migrated parts. The only difference: if a part has both “␣” and a substring configured, leading and trailing spaces are now trimmed after extracting the substring, rather than before.
Fixed the “Combined value” rule: each part’s source is now resolved as the schedule sees it (an instance or type parameter, or a shared parameter with the same name but a different GUID). Previously, a part could be missing from the result while ▶ reported “already matched”. The report shows how many elements have an empty source for a part. These rules should be recalculated.
The “Formatting” tab mirrors the Revit dialog: heading, orientation, alignment, “Field Format…”, “Hidden field”, and the “No calculation” calculation setting. Added “Show conditional formatting on sheets” and “Multiple values display” (“<varies>” or custom text); these work for several selected fields at once. “Conditional Format…” is shown but unavailable: conditions are configured in Revit’s native dialog.
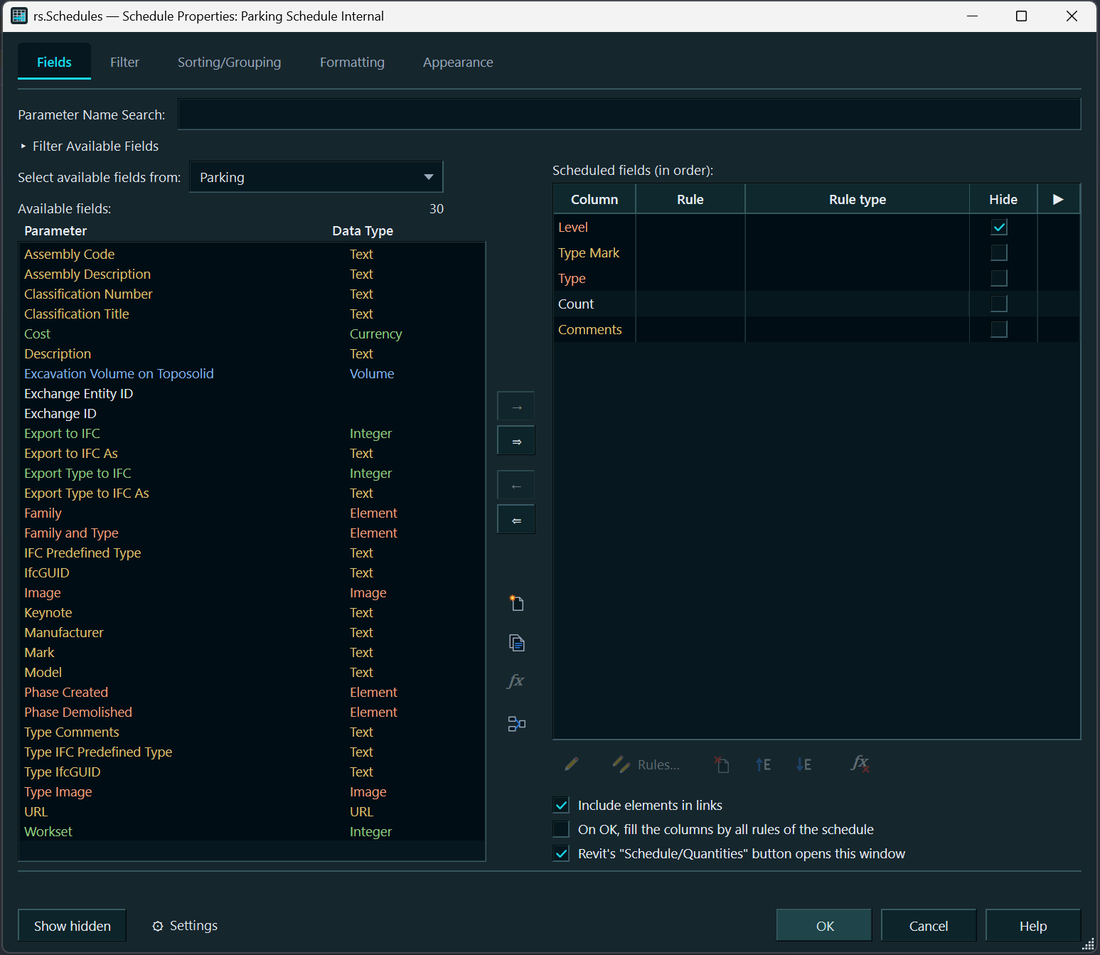
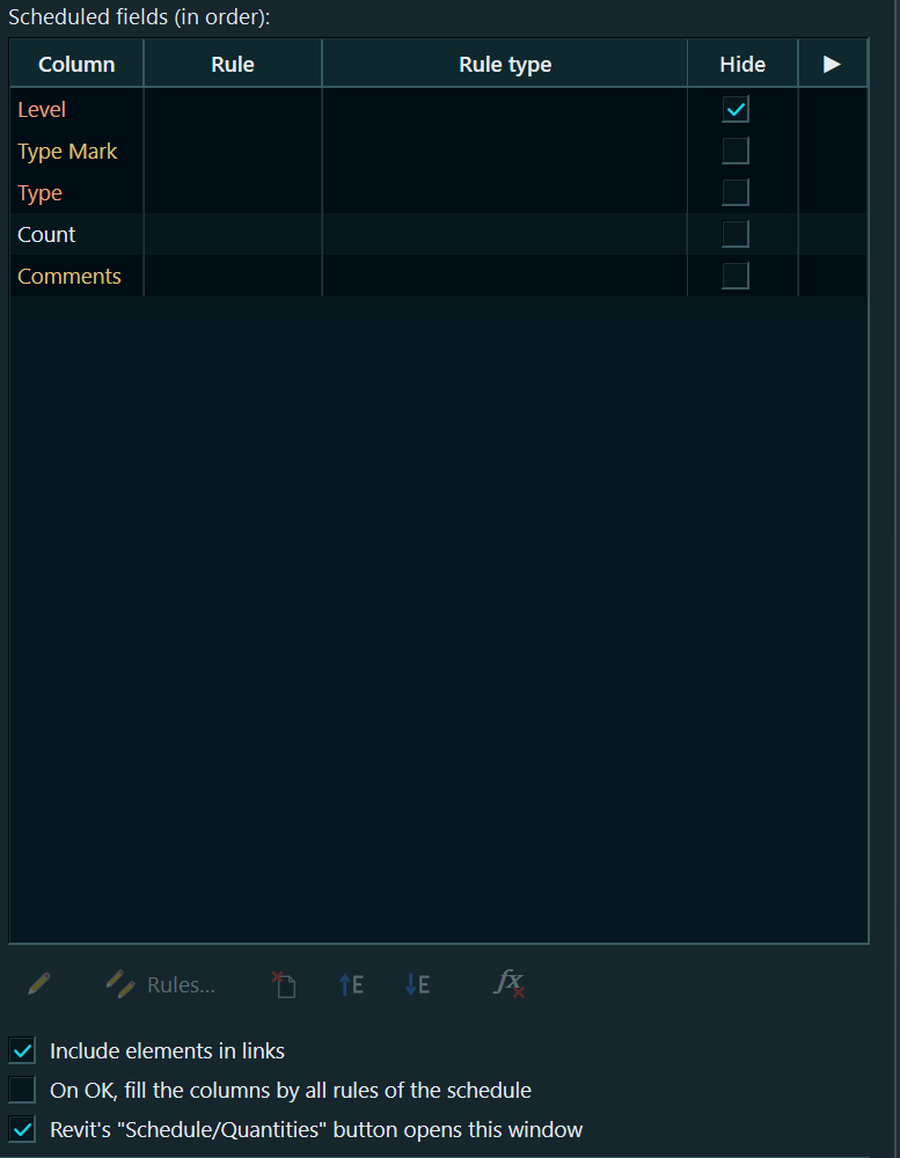
The “Fields” tab now has a “Data type” column in “Available fields”. Three checkboxes (linked files, applying fill rules on OK, and the “Schedule/Quantities” button) have moved below the field list icons. “⚙ Settings” can enable parameter highlighting using RS.ParamManager colors: the background indicates the parameter kind and the text color indicates its data type. This is disabled by default.
View tab coloring is now available in every product in the range, with the same features and shared settings in the “⚙ Settings” window: full tab fill or a stripe, with colors assigned by project or by file. Full tab fill is the default. The previous style choice was not retained, so tabs are filled after the update; re-enable the stripe style if needed. The active tab is no longer brighter than the others: a stripe in the project color along its top edge identifies it. The first product to load handles tab coloring, so update every product in the range.
The free RS.BIMManager agent is included with every product in the range: it is installed if missing, left unchanged if already present and up to date, and updated if outdated. It does not affect the product’s license. The BIM ribbon button appears only where the RS.BIMManager application is installed.
The RS.CDE folder next to the model and empty databases within it are no longer created automatically when a model, panel, or report is opened. Storage is created only when you save your first entry, such as a message, assignment, or status.
1.3.5 | 14.10.2026
“Filter” and “Sorting/Grouping” now match Revit: 8 filter conditions and 4 sorting levels, with “(none)” first in the field list.
“Advanced mode” on these tabs lets you define a filter condition or sorting level using an expression (“ƒx Expression…”, with functions such as LEFT, MID, and TEXTBEFORE). The result is written to an internal text instance parameter that Revit uses for its native filtering and sorting. The parameter and its hidden field remain in the model after the expression is removed. Expressions are evaluated for all elements in the category, so test on a copy when working with large models. This mode does not work for elements in linked files.
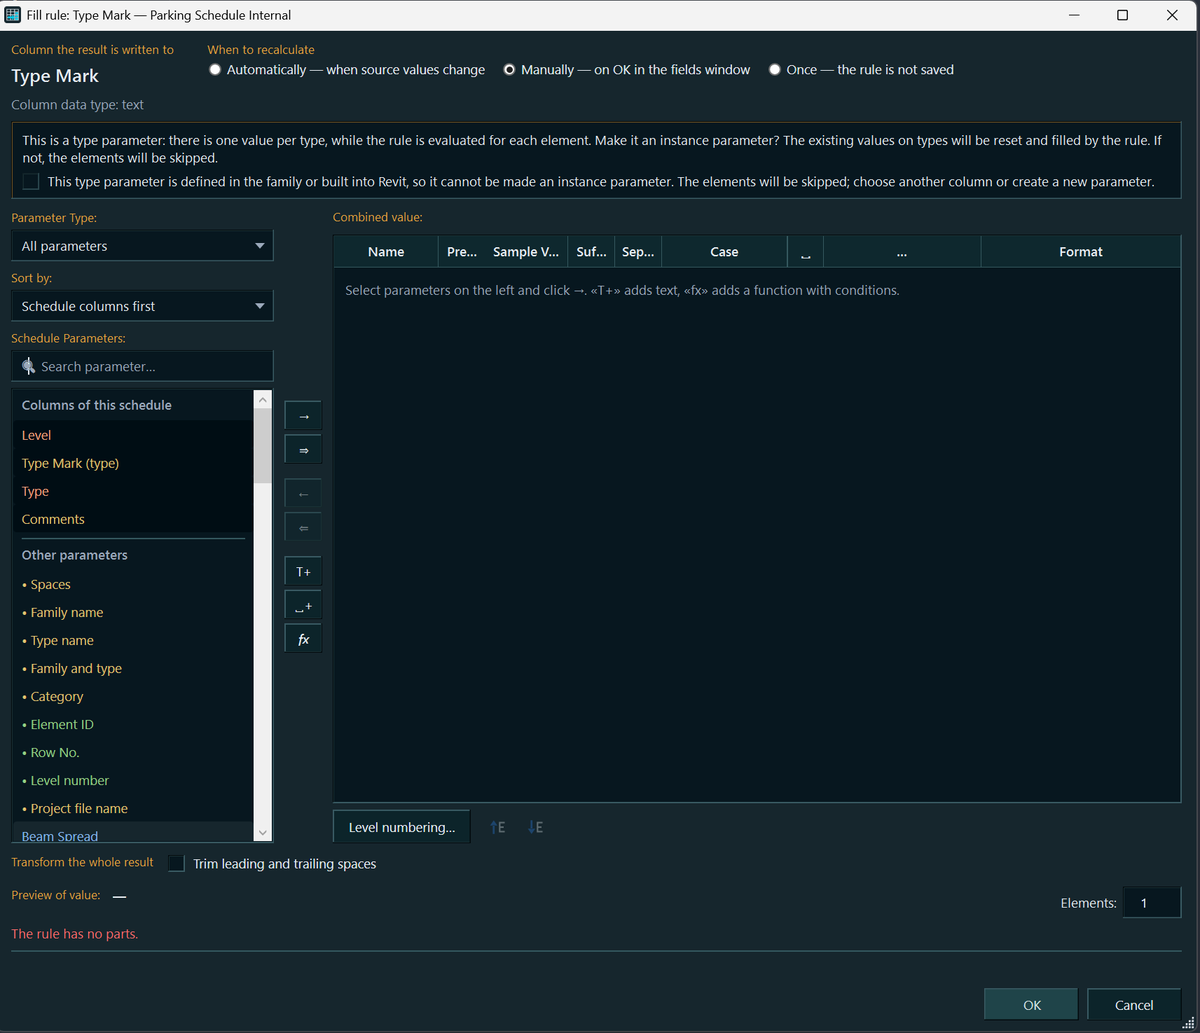
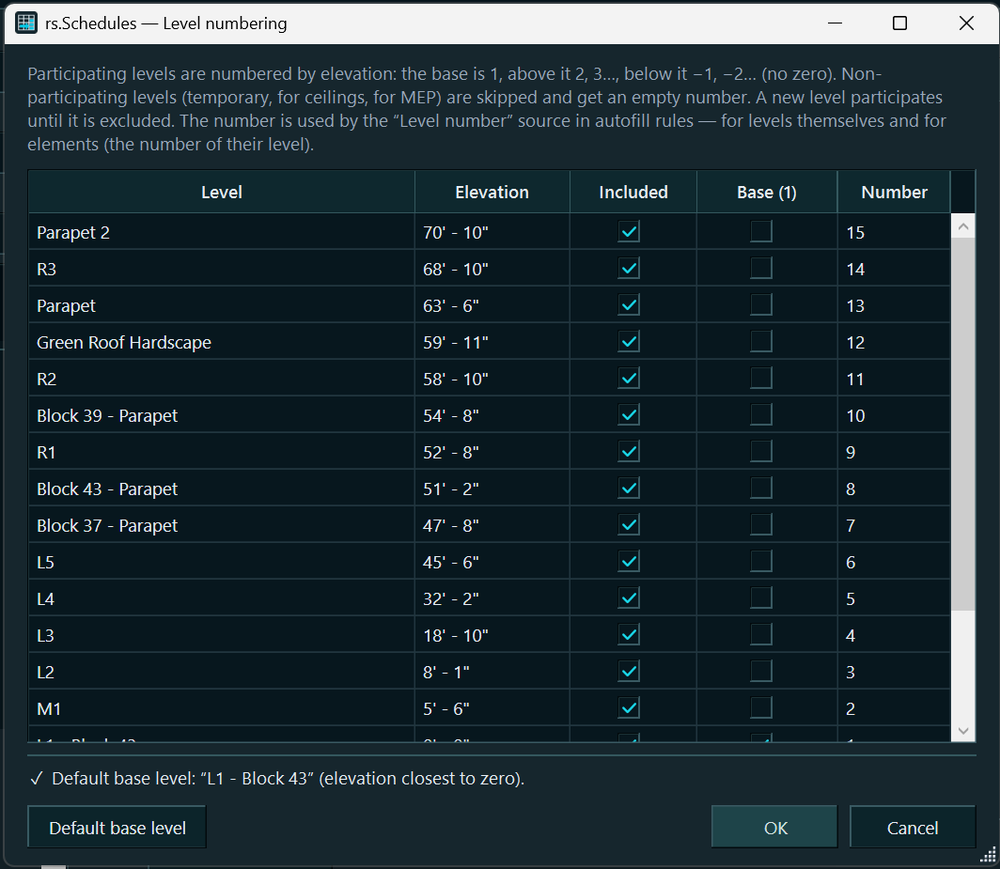
Level numbering: a “Level number” source for fill rules and a “Level numbering…” button (the base level is 1; levels above are 2, 3…; levels below are −1, −2…; there is no zero; temporary levels can be excluded using the “Participates” checkbox). In “Automatic” mode, numbers are recalculated when a level is added or deleted, or when its elevation or name changes.
The “Fields” tab now shows only fields from the schedule’s category by default. Previously, “Levels” and other categories could list hundreds of shared parameters from the model. Fields for related elements, including “Project information”, “From Room”, “To Room”, and linked files, are selected from “Select available fields from:”.
Fixed: “Format” and “…” worked only on a previously selected row and applied to a single row; formatting could not be set for a parameter missing from some elements. Units set to “Use project settings” are no longer appended if the unit symbol is disabled in the project (“985” instead of “985 mm”). A column’s read-only status is now determined from all elements, rather than the first 200. Previously, this could mark an entire column as unavailable in schedules of nested families.
1.3.1–1.3.4 | 12–13.10.2026
Updates in a single window. When checking for updates, any plugin in the range displays the shared “RS-Systems Updates” window, listing new versions of all installed products, including those installed later or for a different Revit version. The options are “Update”, “Not now”, “Skip this version”, and “Don’t ask again” (this can be reversed using the “Offer updates for this product” checkbox in “Settings”). The selected products are installed in one batch after Revit exits, with administrator permission requested only once. “Settings” → “Updates for all RS-Systems products…” starts a manual check.
Extend the trial with a code: the “Trial extension” tab in the activation window displays a request code, in response to which you receive an extension code (+30 days by default). This works offline. The code is tied to your PC and the plugin and can be used once.
Offline activation: a license issued for your PC (an RSLIC1… code or the text of a .rslic file) is applied immediately, without contacting the website, which is useful for remote and isolated workstations. A code that is not tied to a PC remains single-use and must be redeemed through the website. Fixed: the website rejected codes pasted with spaces or line breaks (from email or a remote desktop clipboard) with the message “Malformed activation code”.
Short website codes in the format RS-XXXX-XXXX-XXXX (from email, your account, or a purchase made without the plugin) are now accepted on the “Code” tab. Letter case, spaces, and hyphens do not matter. The code is assigned to this PC, and the license is downloaded automatically. These codes cannot be activated without an internet connection.
Suite licensing fixed: previously, a purchased suite did not activate any plugins. It now applies to every plugin included in that suite.
Consistent naming: windows and messages use rs.<Name>, while “Add or remove programs” and installer filenames use RS.RVT.<Name>. The new MSI upgrades the existing installation in place, preserving licenses and the trial period.
1.3.0–1.3.4 | 12–13.10.2026
The “Fields” tab now has icon buttons like those in the Revit dialog: add and remove a field, “New parameter”, a parameter from a shared parameter file, “Combine parameters”, “Edit”, “Up”, and “Down”. Double-clicking a field still opens its fill rule.
“Combine parameters” mirrors the Revit dialog (name and parts with a prefix, suffix, and separator). The new field is created on OK along with the other changes. This works in Revit 2022 and later. Revit 2021 has no corresponding API, so the button is unavailable.
“Delete parameter” removes the parameter from the project immediately after confirmation, in its own transaction; it can be reversed using Revit’s Undo command. Built-in Revit parameters cannot be deleted. The API cannot create a Revit calculated field; use a fill rule with formulas instead.
Fixed: unit formatting and the part formula applied to only one row, even when several rows were selected. The result of the “Format” dialog and the formula now apply to all selected parts if the row containing the clicked button is among them; otherwise, they apply only to that row. The result (“applied to parts: N; skipped: M”) appears in the status bar.
1.2.0–1.2.9 | 11–12.10.2026
Revit’s “Schedule/Quantities” button opens the RS.Schedules creation dialog, followed by the properties dialog with “Fields”, “Filter”, “Sorting/Grouping”, “Formatting”, and “Appearance” tabs, providing a replacement for the native dialog in terms of functionality. The dialog imposes no limit on the number of filter conditions or sorting levels; filters are combined with AND. Clicking OK applies everything in a single “RS: schedule properties” transaction, which can be undone with one Revit action. This command interception can be disabled with a checkbox in the dialog. If another plugin already handles the command, the Revit dialog opens. Conditional formatting, line styles, and row height are unavailable through the Revit API; use the native dialog for these.
The “Format” dialog mirrors Revit: units, rounding and increment, unit symbol (including “None”), zero suppression, and digit grouping. Formatting can be set for a field on the “Formatting” tab and for each rule part. For several selected parts at once, “Use project settings” applies to any part with units; custom units apply only where valid (meters for lengths, but not for areas). Existing rules continue to work as before.
Excel-style formulas for rule parts accept Russian or English function names: take characters from the left, from the right, or starting at the Nth character; get text before or after a character; round; substitute; change case; and trim spaces. Rounding uses the first number in the text and preserves units: “4.80 m” becomes “4.8 m”. The formula dialog previews the result for the first elements in the schedule. Invalid formulas cannot be saved.
The “Spaces” rule part sets an exact number of spaces. A separator is no longer added automatically. For existing rules, separators consisting only of spaces are removed when read, so values may be recalculated without extra spaces after the update. Separators containing other characters (“/”, “ / ”) are retained.
“Sample value” displays the rule’s result for a specified number of elements (1 by default, up to 500), with one line per element showing its family, type, and Id. Messages, including write results, errors, and changes rejected by Revit, appear in the status bar instead of dialogs. If Revit accepts only some changes, the dialog stays open, and the accepted changes have already been written.
If a parameter cannot be filled, the reason is given along with an example element Id. For shared nested families, the explanation is specific: the nested instance’s parameter is linked to a parent parameter and is read-only. Write the value in the parent family’s schedule; it will also appear in the nested family.
1.1.0–1.1.8 | 11.10.2026
The main window mirrors the “Fields” tab in Revit’s schedule properties: search, an available-field filter (instance parameters, type parameters, and project information), “Available fields” and “Scheduled fields” lists with arrows and “Up/Down”, and “Include elements in links”. Clicking OK applies the field selection and order in a single “RS: schedule fields and rules” transaction. The dialog prompts when closed with unsaved changes.
“Fill…” opens the rule for the selected field. The scheduled fields list has three columns: “Column”, “Rule” (displayed as a combined parameter value), and “Rule type” (automatic, manual, or once). An existing rule always opens, even when the column is currently not writable: it can be edited or deleted, and elements are skipped when writing. A new rule cannot be created for such a column.
The ▶ button next to a field with a “Manual” rule writes values immediately in a single “RS: fill «…» using rule” transaction, which can be undone with one Revit action. The report shows the result: written, already matched, and skipped with reasons. The “Fill columns using all schedule rules on OK” checkbox also overwrites values using the other rules. Enable it deliberately.
“New parameter…” mirrors Revit’s “Parameter Properties” dialog: project or shared parameter (from a shared parameter file), discipline, data type, group, and type or instance. The parameter is bound to the schedule’s categories and immediately added to the fields. It is created immediately and remains in the project even after Cancel, just as in Revit. A project parameter is created as a shared parameter through a temporary file; your shared parameter file is unchanged.
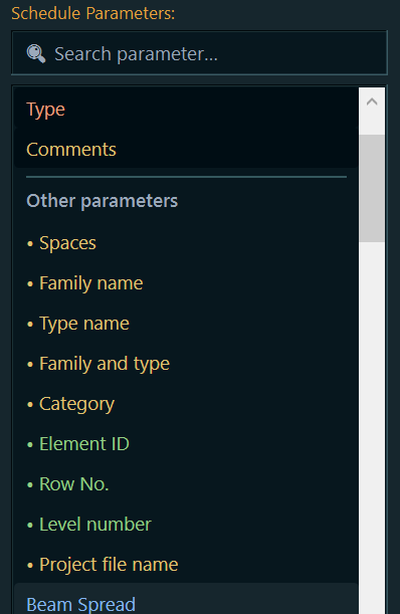
Dialogs remember their size and position, and the main window can now be made smaller. Tab, arrow keys, and the space bar work in the parts table. The rule’s parameter list is divided into “Columns in this schedule” and “Other parameters”, supports quick search by typing letters, and distinguishes parameters with identical names by kind (shared, with the beginning of the GUID; project; or built-in).
1.0.0–1.0.4 | 11.10.2026 — first release
“Show Hidden” on the schedule’s contextual tab displays all hidden columns, highlighting them in light pink, and hides them again when toggled off. The previous state is stored in the schedule itself, so it is restored exactly even after restarting Revit. Before Save, Save As, and synchronization, the temporarily displayed columns are hidden automatically so that the model is not saved with an altered appearance.
“Autofill” (later “Fill…”) assembles a column value from element parameters: parts with a prefix, suffix, and separator, as in a combined parameter; instance parameters, type parameters, and project information; family and type names; category; Id; filename; and fixed text. An empty part is skipped entirely. Transformations can be applied to each part and to the final result: trim spaces, change case, extract a substring, set units, and set the number of decimal places. The rule dialog is modeled on Revit’s “Combine parameters” dialog.
The result is written to an instance parameter, either in an existing column or in a new shared parameter bound to the schedule’s categories. Types are checked: text accepts any input, length only accepts a length, area only accepts an area, and exactly one parameter is written to a numeric column. Modes are automatic when source values change, manual, and once. Writing uses a single transaction, reversible with one Undo. Revit warnings about duplicate marks are suppressed. The result shows what was written, what already matched, and what was skipped (read-only, element owned by another user, or missing parameter).
If a column uses a type parameter, the plugin offers to convert it to an instance parameter by rebinding it with the same group and categories. Family parameters and built-in parameters cannot be converted this way, and their elements are skipped. Columns that cannot be written remain in the list in gray with a reason: calculated or combined field, project information, element reference, unsupported data type, or read-only. Availability is determined from the first 200 elements.
Rules are stored in the schedule itself and copied with it; the copy’s rules can be changed independently. A model containing rules can also be opened without the plugin. Values will not be recalculated without the plugin, but no warnings are shown. This works for any schedule with field columns, except templates, revision schedules, and keynote legends. Only “Show Hidden” is available in material takeoffs. The parts table now has the appearance and behavior of a Revit table.